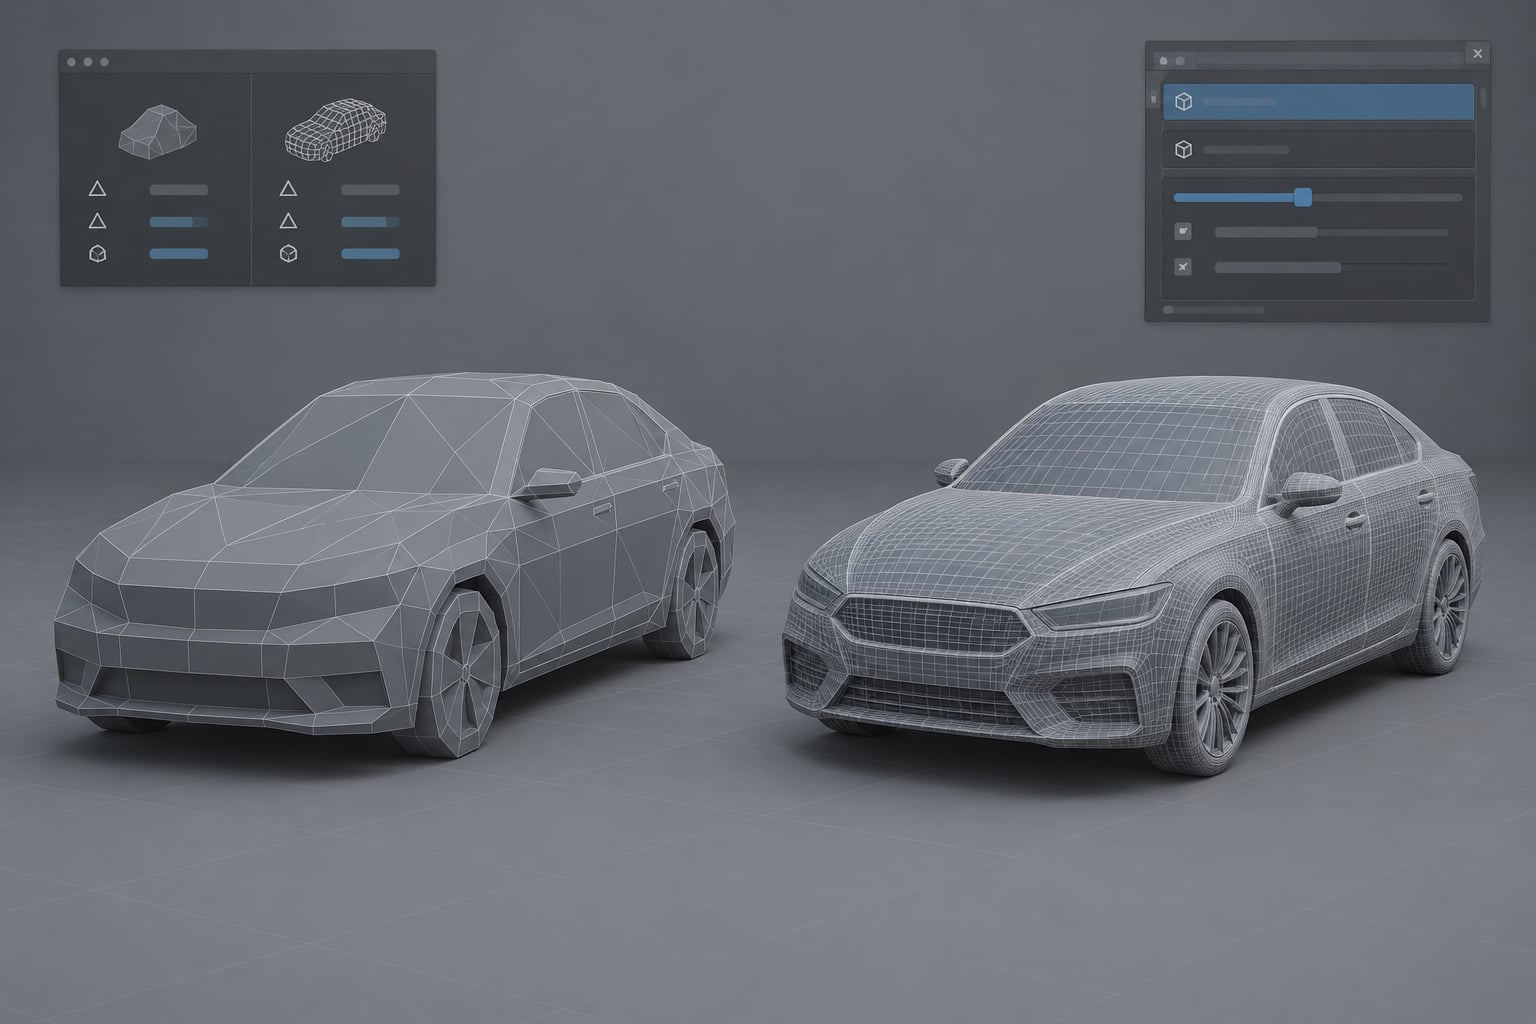
Learning how to reduce polygon count on a car model comes down to three habits: clean the mesh, decimate in small passes, and check the silhouette from a distance after every pass. In Blender 4.x the whole job is one modifier, a ratio slider, and about twenty minutes on a mid-weight model. The trick is that geometry you never see can often be deleted outright, which buys you far more than the decimation slider does.
That matters because a car is a hard case for reduction. Curved body panels need enough segments to stay round, the windscreen has to stay a clean surface for transparency, and wheels are separate objects that often carry more detail than the body. This guide walks through a full workflow in Blender 4.x, from recording the original count to exporting a validated file.
Table of Contents
- 1What You Need Before You Start
- 2Step-by-Step: Reducing Polygon Count on a Car Model
- 31. Inspect the car model and record its polygon count
- 42. Fix the car model before you reduce anything
- 53. Remove geometry that is never seen
- 64. Use the Decimate modifier to reduce polygon count on a car model
- 75. Rebuild important details and preserve materials
- 86. Validate the reduced model and export it
- 9Common mistakes to avoid
- 10Frequently Asked Questions
- 11How much should I reduce a car model’s polygon count?
- 12Will decimation ruin my car model?
- 13How do I check the final polygon or triangle count?
- 14Should I reduce polygons before or after UV mapping?
- 15Why does my decimated car look distorted?
- 16Conclusion
What You Need Before You Start
You need Blender 4.x open with the car model loaded, a UV map and assigned materials, and a rough idea of the triangle budget your target engine wants. If the car came from a scan or a marketplace pack, look for a lower-poly version you can compare against before touching anything.
Understanding modifiers helps too. Every reduction step below leans on a modifier rather than a manual edit, so you can change your mind without redoing work.
Two numbers matter more than you might expect. Polygon count in Blender means faces, and a quad face still becomes two triangles once a game engine renders it. That is why a car with 30,000 faces can behave like a 60,000-triangle model in a game. When a performance guide quotes a triangle budget, it is counting the rendered triangles, not the faces Blender shows you.
Before anything destructive, save a copy. Duplicate the file, or save a new version with the original untouched. Applying a modifier is permanent unless you undo, and an undo six steps later is not a version control system.
Step-by-Step: Reducing Polygon Count on a Car Model
1. Inspect the car model and record its polygon count
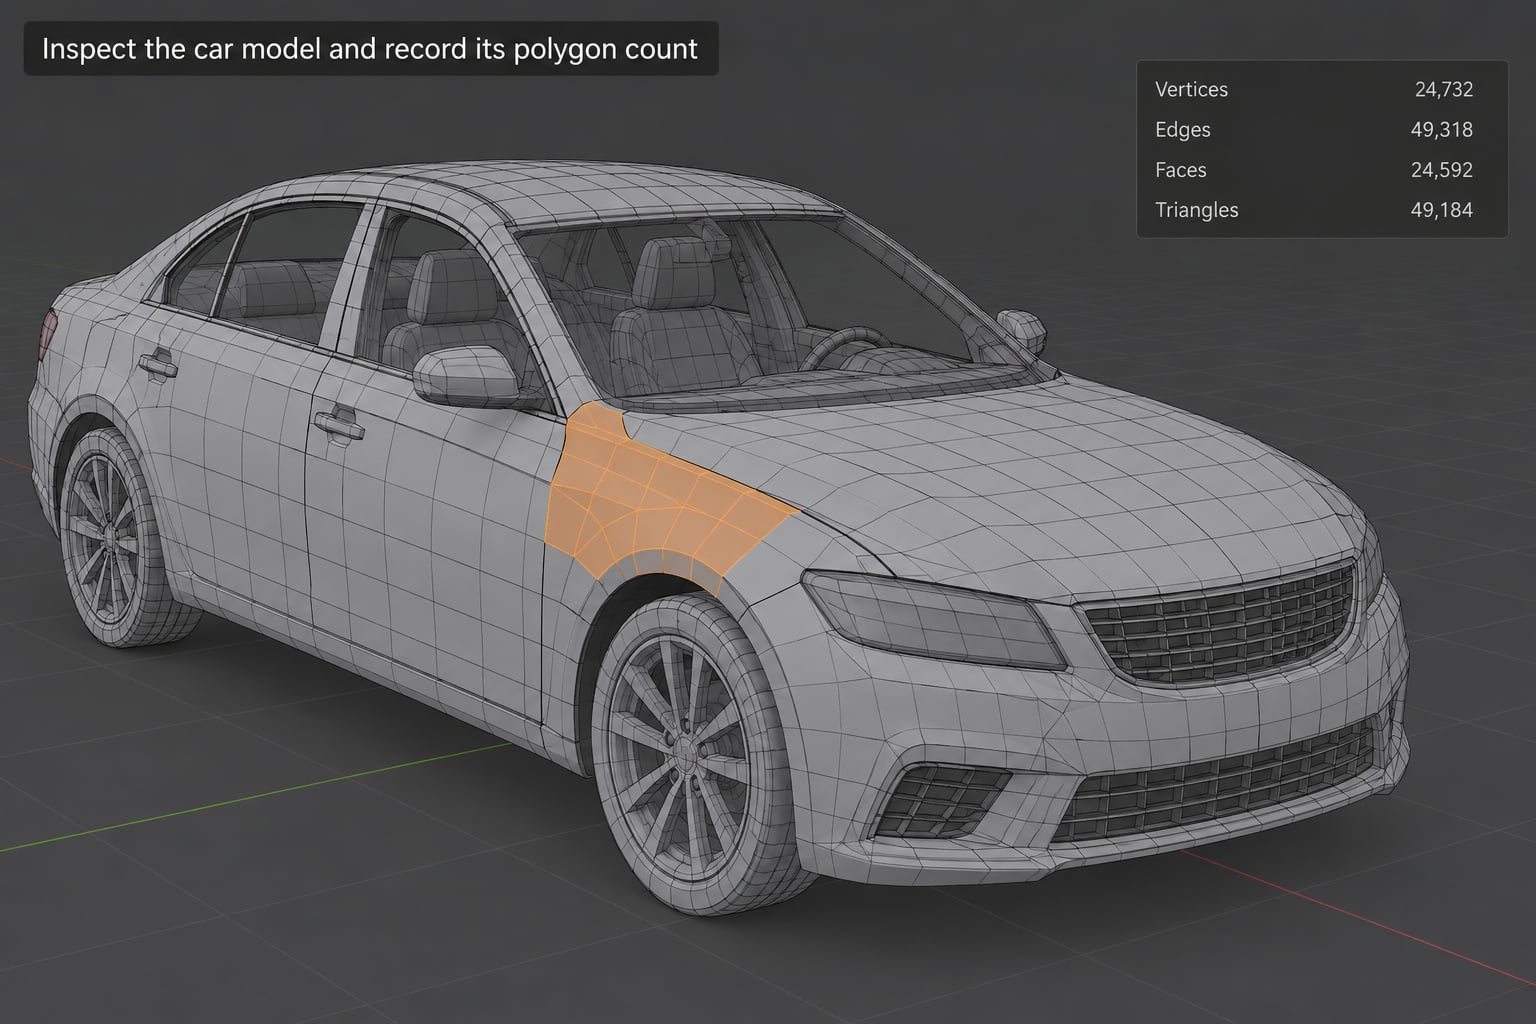
Select the car object, press Tab to enter Edit Mode, then press A to select all geometry. With the Statistics panel open, either right-click any viewport header and tick Statistics, or move the mouse over the 3D Viewport and press N to open the sidebar and choose the Statistics tab.
Write down four figures: vertices, edges, faces, and triangles. Do this for each separate object in the collection, because a car is rarely one mesh. Body, glass, wheels, interior, and undercarriage are usually separate objects with very different density.
Game limits and performance budgets usually refer to triangles rather than Blender faces, so convert when you compare numbers. A quad mesh has roughly twice as many triangles as faces once triangulated.
While you are in there, look for the usual suspects: an unapplied Subdivision Surface modifier multiplying the real count several times over, mirrored geometry still duplicated, and hidden objects you forgot about entirely. The Outliner in the top right shows every object in the file, including ones hidden from the viewport.
2. Fix the car model before you reduce anything
Reduction on a messy model produces messy results, so spend the first ten minutes cleaning rather than decimating. Evaluate what you need and apply the rest. A Subsurf modifier set to level 2 or 3 on a car body is the single most common reason a mid-poly asset reports an enormous number of faces.
Remove loose geometry with Select then All by Trait, then More Than, then Loose Geometry, and delete. To find disconnected pieces, use Select then All by Trait, then Non Manifold, or enter Edit Mode, hover a vertex, and press L to select linked geometry one island at a time. Anything floating on its own deserves a look.
Set object scale to a clean value with Ctrl+A, then Apply All Transforms. Imported models often arrive at a strange scale, and decimation results are much easier to judge once the object sits at scale 1.00 in the N panel.
Separate mirrored parts before you reduce them. If the left and right sides are duplicates with a Mirror modifier, decimate one half and keep the modifier. If they are already baked into one mesh, you are decimating twice the geometry you need.
One caution: cleanup should not change the intended silhouette. Merging vertices too aggressively closes panel gaps and turns a crease into a dent.
3. Remove geometry that is never seen
The cheapest polygons are the ones you delete. Most game cars have a detailed engine bay, exhaust underside, and full interior that the player will never look at closely, and every one of those faces costs frame time.
Use Local View with the selected object and NumPad slash to isolate one part at a time. View through the car with the body selected and look for interior shells, duplicated panels, and helper geometry left over from Boolean cuts. Anything sitting behind an opaque panel is a free win.
Turn on material preview with the Z key and cycle to a wireframe or solid view to catch overlapping surfaces. Z-fighting between two coincident shells is a clear sign that duplicate geometry doubled the face count for nothing.
Ground-contact geometry deserves a separate look. Sideskirts, exhaust tips, and suspension arms modelled in full detail are only ever seen from a camera a few centimetres off the tarmac, if at all. Simplify them by hand in Edit Mode with proportional editing at a low falloff.
4. Use the Decimate modifier to reduce polygon count on a car model
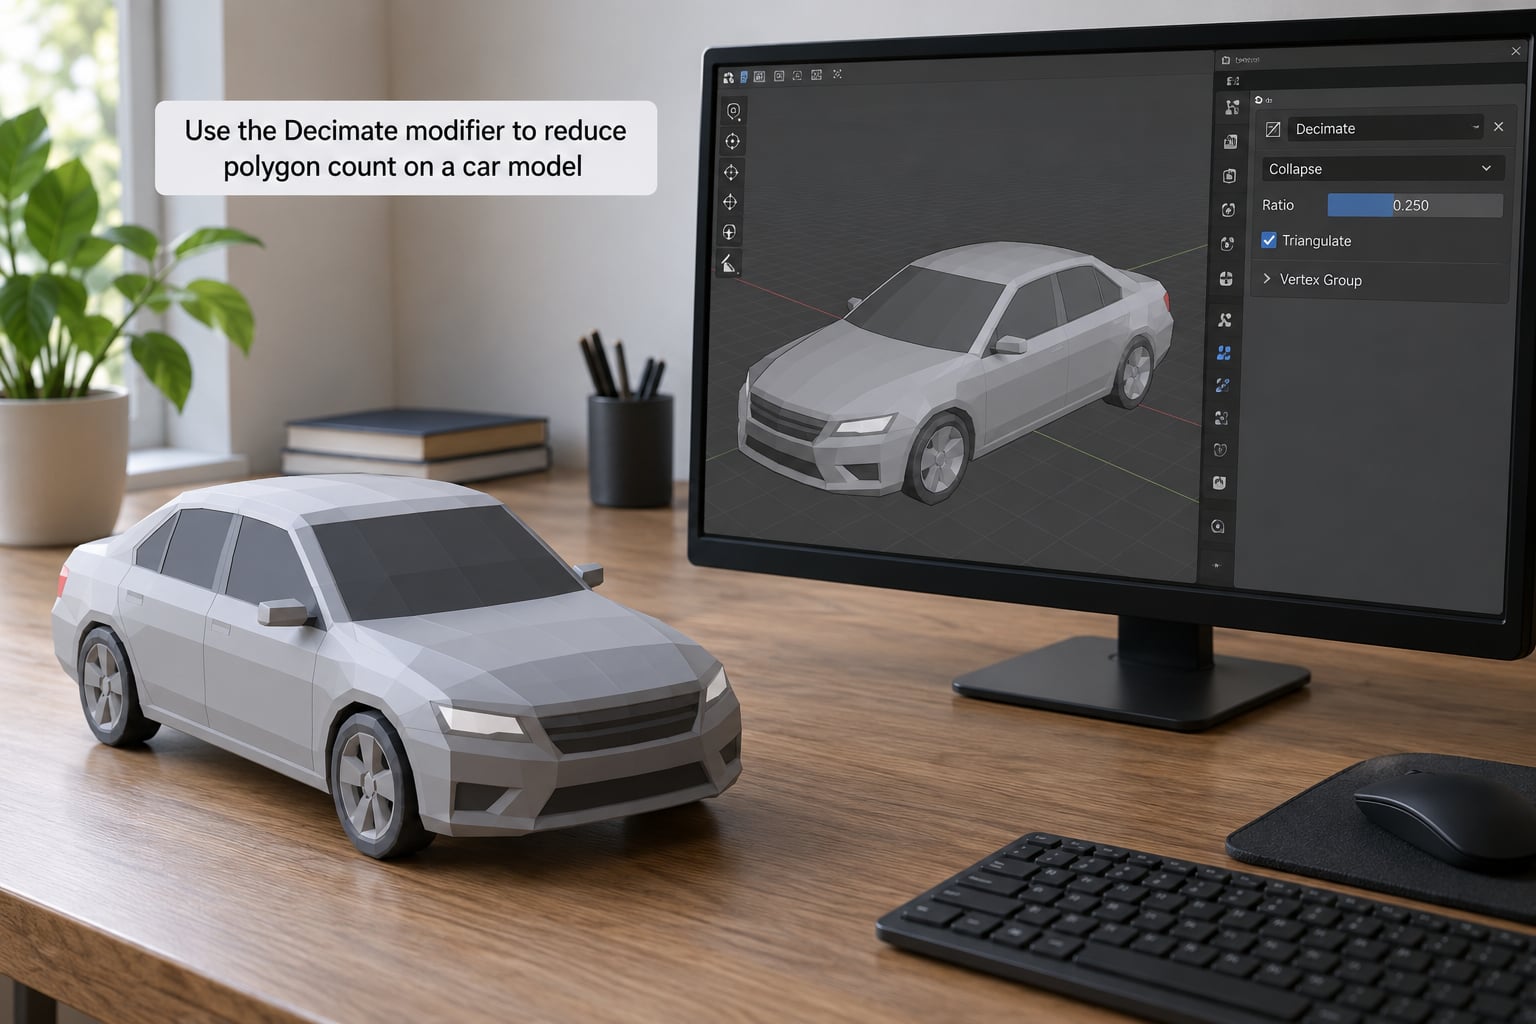
Duplicate the object first, then select the editable copy and go to Properties, then the wrench-shaped Modifier tab, then Add Modifier, then Decimate. In Blender 4.x the modifier lives under the Generate category.
Collapse is the default method and the one most car models want. Set Ratio to 0.7 first, look at the model, then step down through 0.6, 0.5, and 0.4 rather than jumping straight to 0.1. Forum advice across Blender and CAD communities consistently puts the safe zone between 0.6 and 0.7, and that matches what I see in practice on body panels.
Check the Symmetry box only when your mesh is mirrored along an axis, and leave Triangulate off until export if you want to keep quads for later editing.
Un-Subdivide is the other mode worth knowing. It removes subdivision levels rather than merging arbitrary vertices, which keeps the shape truer on smooth panels. It reduces faces and edges without cutting vertex count nearly as much, so if your problem is too many vertices, use Collapse instead.
Planar mode, called Decimate by Angle in some versions, removes edges above a set angle and is a poor fit for a car body full of curves. It earns its place on flat, hard-surface pieces such as a chassis plate or a spoiler.
One aggressive pass is where things go wrong. Heavy reduction flattens the windscreen curve, rounds off the headlights into blobs, closes panel gaps, and often collapses a wheel into a lumpy disc. Several gentle passes plus manual cleanup beats one brutal ratio every time.
5. Rebuild important details and preserve materials
Decimation does not know what matters. After each pass, zoom out and check the silhouette against the original, then look at the features the player will actually notice: headlights, grille openings, mirrors, exhaust tips, wheel spokes, and the creases along the flanks.
Small details are cheap to add back by hand. A mirror is a few faces. A grille opening is a delete plus an inset. Wheels usually do not need reduction at all, because a real tyre profile is already low-poly.
Check UV distortion in the UV Editing workspace with a checker image loaded. Collapsed faces bunch the UVs together and your textures smear. If a material boundary has merged into its neighbour, edit the seam while the reduced mesh is still intact rather than after applying.
Shading is where reduction usually announces itself. Select the body, open the Object Data Properties tab, click Normals, then Clear Custom Split Normals. In the viewport choose the Smooth by Angle operator from the normals menu and set the angle near 30 degrees. Smooth faces on flat panels now keep a crisp edge where you want one, and the rounded parts stay rounded.
A small bevel modifier at low width will catch the highlight on a body crease that decimation flattened. It adds a handful of faces rather than thousands.
6. Validate the reduced model and export it
Compare the two versions side by side from a front three-quarter angle, a side profile, and a straight rear view. Silhouette matters more than numbers, and the profile view catches a sagging roofline that a front view hides. Orbit at eye level around the wheel arches too, since that is where reduction shows first.
Re-run the Statistics panel and record the new face and triangle count. Then open it in the target engine. Nothing replaces an in-engine test, because texture resolution, normal maps, and shadow settings can hide problems that look clean in the viewport.
Confirm that textures still line up, that collision meshes still fit the reduced body without floating or sinking, and that you have LOD levels if the engine expects them. For GTA V and FiveM work, the model usually ends up as a YFT through OpenIV, and draw distance settings decide how many cars the game keeps loaded around the player. Reducing the count of the cars nearest you matters far more than shaving the total budget.
Leave the Decimate modifier unapplied if you still want to tune the ratio, and apply it only once you are satisfied. Export as FBX for Unity and Unreal workflows, OBJ when you want geometry only, and keep the scale at 1.00 with the engine’s usual up-axis conversion. Save the finished file with a name that says what it is, such as sedan_low_28k, and keep the high-poly source next to it.
Common mistakes to avoid
Reducing the wrong object is the classic one. Many modders select the collection and hope. Select the specific mesh, confirm its name in the corner of the viewport, and check the count in Statistics before you add the modifier.
Using an overly aggressive ratio usually ends with a lumpy car and a full undo. If a single pass cannot get you there, the model needs manual work rather than a harsher slider setting.
Ignoring triangle budgets leaves you optimising the wrong figure. Decide the target in triangles at the start, because the same car can read as half that number in Blender and double it in the engine.
Damaging UVs or normals quietly wrecks the paint and glass. Undo back to the previous pass and reduce more gently.
Breaking mirrored parts leaves one side detailed and the other side flat. Keep the Mirror modifier live until the final apply.
Losing collision data means the car’s handling geometry no longer matches what the player sees. Rebuild the collision mesh separately at low detail instead of decimating it alongside the body.
Judging from a single angle hides distortion. Spend the extra ten seconds on the profile view before you commit.
A few habits make this repeatable. Write your target triangle number at the top of the blend file, treat each decimation pass as its own saved version, and always test an export before starting a new pass. Community trust in this topic is earned by numbers, so record the count at every stage and compare it honestly.
Frequently Asked Questions
How much should I reduce a car model’s polygon count?
It depends on where the car appears. Background traffic in a driving game can sit around 20k to 50k triangles, a player vehicle usually lands between 60k and 120k, and a hero or showcase car can justify several hundred thousand. Mobile and browser targets need far less. Pick a number before you start, write it down, and work toward it in small passes rather than guessing at the end.
Will decimation ruin my car model?
Not if you use it carefully. The Decimate modifier is non-destructive until you apply it, so you can always lower the ratio and get the original back. Damage happens when you drop the ratio too far in one pass, which flattens curves, closes panel gaps, and rounds off small parts. Gentle passes between 0.6 and 0.7, checked from a distance after each one, rarely show visible damage.
How do I check the final polygon or triangle count?
In Blender, select the object, enter Edit Mode, select all, and open the Statistics tab in the sidebar. It reports vertices, edges, faces, and triangles for the selected geometry. Remember that quad faces become two triangles in a game engine, so a mesh with 30k faces can render as 60k triangles. Check again after applying the modifier, and again inside the engine, where LOD and streaming may change what is actually drawn.
Should I reduce polygons before or after UV mapping?
Reduce before you finish detailing the UV layout, but keep the UV map in place while you work so you can check for distortion. Decimation collapses faces and bunches UVs in the same places, so unwrapping a finished layout on a heavily reduced mesh wastes effort. If the layout is already final, watch the UV distortion in the UV Editing workspace after each pass and fix the worst spots while there are still vertices to move.
Why does my decimated car look distorted?
Most distortion comes from one aggressive pass rather than from decimation itself. Check the Ratio value, raise it, and step down in smaller increments. Other causes include a Subdivision Surface modifier still stacked above the Decimate in the modifier stack, duplicate geometry creating coincident surfaces that z-fight, and smooth shading applied across sharp panel edges. Clear custom split normals and use Smooth by Angle at about 30 degrees to fix the shading part.
Conclusion
Reducing the polygon count on a car model is mostly restraint. Clean the mesh, delete what nobody will see, then run the Decimate modifier in several gentle passes and check the silhouette from a distance each time.
Start here: save a backup, record the original vertex, face, and triangle counts in the Statistics panel, strip out hidden and duplicate geometry, then apply one conservative pass around a 0.7 ratio before testing anything in your game engine.